Skip to content
ExploreCamera Movement Prompt Atlas

CREATOR TOOLKIT · BEGINNER TO ADVANCED

Camera Movement Prompt Atlas

How to use this atlas

This page is AI for Everyone’s camera-movement prompt atlas. It uses the same set of red-chair, white-column and courtyard diagrams to compare 25 common moves and combinations. The 12 beginner entries practise one change at a time: position, orientation, focal length or viewpoint. The 13 advanced entries then practise timing, following a subject, and combined paths. The levels are only this atlas’s learning order, not an industry-wide difficulty scale. The collection covers common wording, not every possible filming method. Not every entry is a physical move: a static shot is a state, a zoom is a change of focal length, and a straight-down bird’s-eye view is a viewpoint.

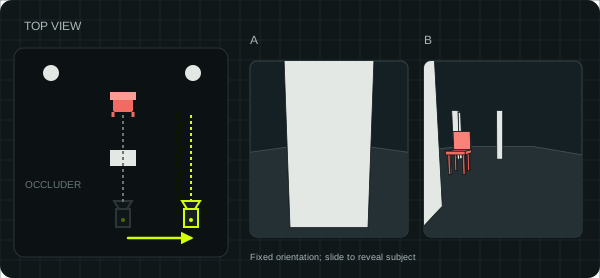
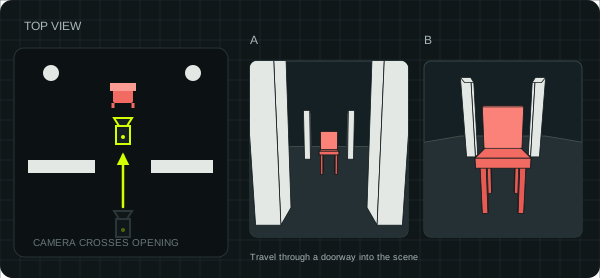
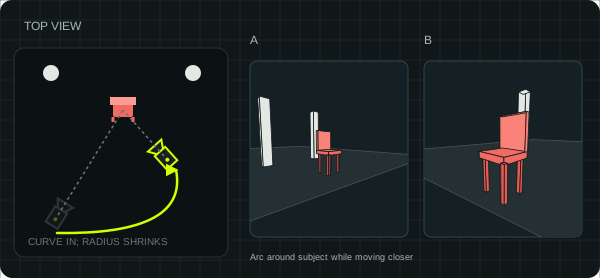
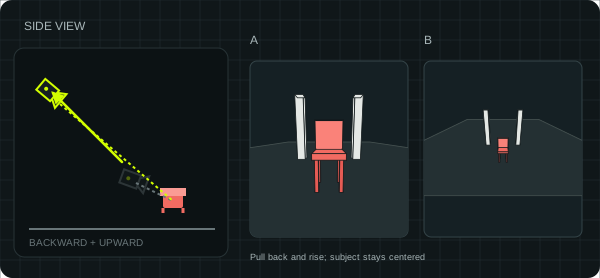
The diagrams are original teaching drawings, not AI-generated video or filmed results. The left image shows the path or viewpoint of the camera or subject; the right image compares framing from A to B; dashed lines and faded shapes mark the starting position. Beginner examples keep the chair, columns and other scene objects still so you can see how the camera itself moves. Advanced prompts use replaceable fields: fill in your subject, setting and target framing, and test a complex path in steps. Adjust duration and speed to the tool you use. You can search below by move, effect or prompt wording, and open all 25 bilingual prompts, path diagrams and mix-up notes. This atlas is original teaching material. The prompts have not been tested in any video-generation model. The diagrams explain intended camera movement; they are not model output or proof of an effect. Different tools and settings can give different results. Check the features and limits of your tool before use, and test a short clip first.

How to write a camera-movement prompt

When you write a camera-movement prompt, finish one move in one sentence. Do not mix several paths in the same sentence. Each sentence should make four things clear: where the camera travels or turns (direction), how fast or slow it goes (speed), the starting framing, the ending framing, and what must stay still, for example whether the subject stays put, whether camera height is fixed, and whether focal length may change. Writing only “steady”, “zoom in”, or “move the lens right” can be read as a slow push-in, a zoom, or a trucking move of the whole camera. The beginner examples in this atlas describe intent with the same scene, one continuous shot, and a target duration of 6 seconds. The words “6 seconds” do not guarantee output length. Replace the red chair, setting, speed and duration with what you need. These lines are a starting point for describing camera intent, not commands for any one tool. Different models may ignore or misread camera movement.

How push-in and zoom differ

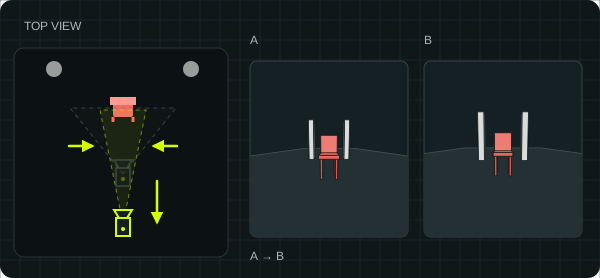
This page lists separately the three “make it larger” methods that are easiest to mix up. Push-in moves the whole camera toward the subject with focal length unchanged. The shooting distance shortens, and perspective changes with it. Zoom-in leaves the camera in place and only increases focal length, so the field of view narrows and the subject looks larger. That is a lens-parameter change, not a camera move, so the perspective relationship between subject and background stays the same. Dolly zoom combines a camera move with a zoom in the opposite direction. In this example the camera pulls back while focal length increases, keeping the red chair about the same size in the frame as the white columns behind it grow. A zoom without a camera move will not create that effect. The retreat and the zoom must stay in step, and you must name the subject whose size should stay constant. Do not write only “enlarge the chair”, and do not describe a zoom as “the camera moves closer”.

A pull-out is the counterpart: the whole camera moves back from the subject with focal length unchanged, revealing more of the surrounding space. If the camera does not retreat and the frame only shrinks, that is a zoom-out, not a pull-out.

A long take is not a camera move

This page also treats “long take / one-shot” as a related shot concept. It is not a 26th camera move. A long take is about the duration and continuity of a single shot. It can be filmed from a fixed camera, or combined with tracking, trucking or orbiting. A long shot is a wide framing, and a long lens is a focal length; neither is a long take. An apparent one-shot sequence may also use hidden cuts. A prompt does not guarantee an uncut result. Duration and continuity depend on the model, so check the actual output yourself.

Common questions

How do I write a camera-movement prompt?

Finish one move in one sentence. Do not mix several paths in the same sentence. Make direction, speed, starting framing, ending framing, and what stays still all clear, for example whether the subject stays put, whether camera height is fixed, and whether focal length may change. Writing only “steady”, “zoom in”, or “move the lens right” can be read as a slow push-in, a zoom, or a trucking move of the whole camera. The beginner examples describe intent with the same scene and one continuous shot. Replace the red chair, setting, speed and duration with what you need. These lines are a starting point for describing camera intent, not commands for any one tool.

How do push-in, zoom and dolly zoom differ?

Push-in moves the whole camera toward the subject with focal length unchanged. The shooting distance shortens, and perspective changes with it. Zoom-in leaves the camera in place and only increases focal length, so the field of view narrows and the subject looks larger. That is a lens-parameter change, not a camera move, so the perspective relationship between subject and background stays the same. Dolly zoom combines a camera move with a zoom in the opposite direction. In this example the camera pulls back while focal length increases, keeping the red chair about the same size in the frame as the white columns behind it grow. A zoom without a camera move will not create that effect.

Is a long take a camera move? How is it different from a long shot or a long lens?

A long take is not a camera move. It is about the duration and continuity of a single shot. It can be filmed from a fixed camera, or combined with tracking, trucking or orbiting. A long shot is a wide framing, and a long lens is a focal length; neither is a long take. An apparent one-shot sequence may also use hidden cuts. A prompt does not guarantee an uncut result. Duration and continuity depend on the model, so check the actual output yourself.

Have these prompts been tested in a model? Are the diagrams generated results?

No. This atlas is original teaching material. The prompts have not been tested in any video-generation model. The diagrams explain intended camera movement; they are not model output or proof of an effect, and they are not AI-generated video or filmed results. Different tools and settings can give different results. Check current features and limits before use, and test a short clip first.

Do a static shot, a zoom and a bird’s-eye view count as camera moves?

Not every listed item is a physical move. A static shot is a state: camera position, orientation and focal length stay unchanged, and the page states that this is a fixed way of shooting, with no camera move. A zoom is a change of focal length, with the camera left in place. A straight-down bird’s-eye view describes a viewing angle; this example is a fixed overhead viewpoint, not a move. The levels are only this atlas’s learning order, not an industry-wide difficulty scale.

Prompts not model-tested

This is original educational content. These prompts have not been tested in any video-generation model. Diagrams explain the intended shot; they are not model outputs or evidence of performance. Results may vary by tool and settings.

Original schematic, not an AI-generated video or filmed result. Left: camera/subject path or viewpoint. Right: framing from A to B. Dashed lines and faded shapes show the starting state.

CameraSubject

25 / 25 techniques

Beginner

Start with one change at a time: position, orientation, focal length or viewpoint.

01

Beginner

Static shot

Static shot · A camera stays fixed in front of a red chair, with two white columns behind the chair and no movement or rotation arrows.

Keep camera position, orientation, and focal length unchanged so the viewer can study the frame. This is a locked-off setup, not a camera movement.

What changes on screen
The red chair and white columns keep the same screen positions, sizes, and relationships, creating a calm, stable composition.
Common mix-up
“Stable” can still allow a slow push-in. For a truly static shot, explicitly rule out translation, rotation, and zoom.
Adaptable prompts

English prompt

A stationary red chair in a pale courtyard, with two stationary white columns behind it, in soft daylight. One continuous shot with an intended duration of 6 seconds, no cuts. The chair, columns, and all other scene objects remain still throughout. Use a level, wide composition showing the full chair and both columns. Lock the camera on a fixed tripod. Keep its position, orientation, and focal length unchanged throughout. No translation, pan, tilt, roll, zoom, or framing drift.

Watch on YouTube ↗
02

Beginner

Pan

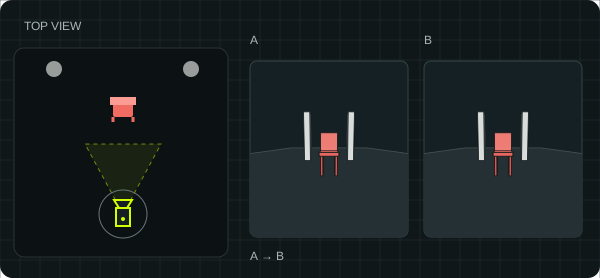
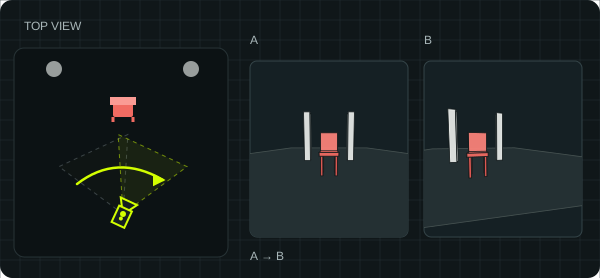
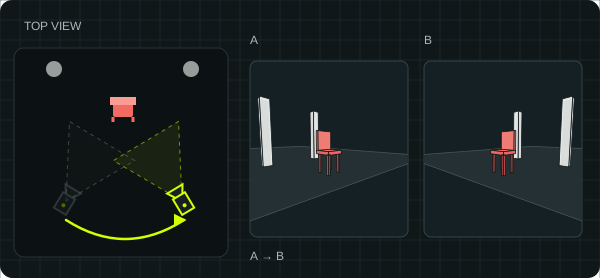
Pan · Top-view diagram: the camera stays in place while its viewing direction turns right around the vertical axis, moving the chair left in the frame.

Keep the camera in one place and rotate its viewing direction horizontally. This example pans right, like turning your head without stepping sideways.

What changes on screen
The view sweeps right across the courtyard. The chair and columns travel left in the frame as new space enters from the right.
Common mix-up
“Move the camera right” may produce a lateral truck. Specify a fixed camera position with only a rightward yaw rotation.
Adaptable prompts

English prompt

A stationary red chair in a pale courtyard, with two stationary white columns behind it, in soft daylight. One continuous shot with an intended duration of 6 seconds, no cuts. The chair, columns, and all other scene objects remain still throughout. Begin with the chair centered in a wide frame. Keep the camera position fixed and slowly pan right at a constant speed, rotating only in yaw around the vertical axis. Let the chair drift toward the left of the frame as more of the courtyard enters on the right. Keep height and focal length unchanged. No lateral translation, tilt, or zoom.

Watch on YouTube ↗
03

Beginner

Tilt

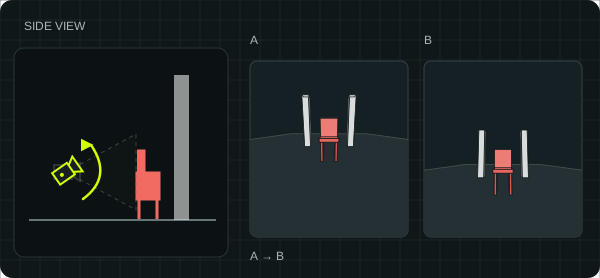
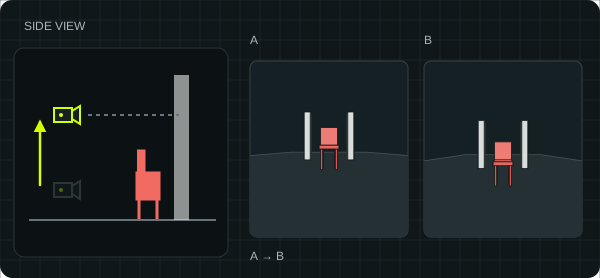
Tilt · Side-view diagram: the camera stays at the same position and height while its viewing direction pivots upward from the chair toward the upper columns.

Keep the camera position fixed and pivot its viewing direction up or down. This example tilts upward without raising the camera itself.

What changes on screen
The view travels upward from the chair toward the tops of the columns and the sky. The chair moves lower in the frame, revealing the scene’s height.
Common mix-up
Tilting up is different from raising the camera. “Move upward” can produce a boom, so explicitly keep the camera height fixed.
Adaptable prompts

English prompt

A stationary red chair in a pale courtyard, with two stationary white columns behind it, in soft daylight. One continuous shot with an intended duration of 6 seconds, no cuts. The chair, columns, and all other scene objects remain still throughout. Start with the full chair and the lower sections of the columns visible. Keep camera position and height fixed. Slowly tilt upward around the horizontal axis so the chair moves toward the bottom of the frame while the upper columns and sky come into view. Keep focal length unchanged. Do not raise or translate the camera, and do not zoom.

Watch on YouTube ↗
04

Beginner

Push-in

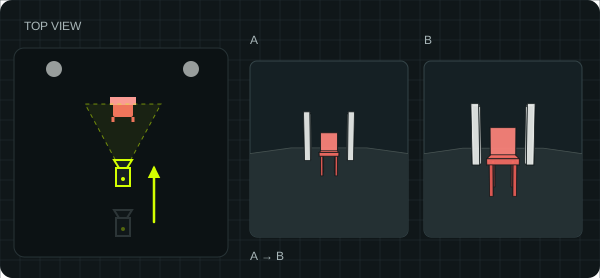
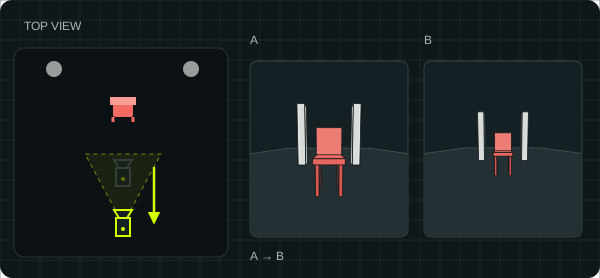
Push-in · Top-view diagram: the camera moves straight toward the stationary red chair with a fixed focal length; the columns behind the chair stay still.

Move the whole camera forward toward the subject while keeping focal length fixed. The shorter camera-to-subject distance changes perspective.

What changes on screen
The chair grows in the frame. Because the nearer chair enlarges faster than the more distant columns, the approach has a clear sense of depth.
Common mix-up
Both a push-in and a zoom can enlarge the subject, but a push-in changes camera position. Specify forward translation with no zoom rather than simply asking for a larger chair.
Adaptable prompts

English prompt

A stationary red chair in a pale courtyard, with two stationary white columns behind it, in soft daylight. One continuous shot with an intended duration of 6 seconds, no cuts. The chair, columns, and all other scene objects remain still throughout. Begin with a wide view of the full chair and both columns. Move the entire camera slowly forward in a straight line toward the chair. Keep camera height and orientation unchanged, with the lens aimed at the chair, a fixed focal length, and no zoom. Let the chair grow in the frame with natural perspective changes between the nearer chair and the farther columns. Do not move the chair toward the camera.

Watch on YouTube ↗
05

Beginner

Pull-out

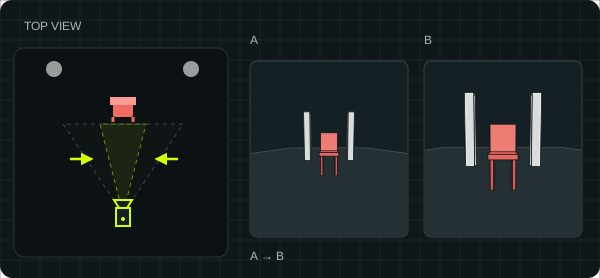
Pull-out · Top-view diagram: the camera moves straight backward away from the stationary chair, keeping orientation and focal length fixed as the view reveals more space.

Move the whole camera backward away from the subject while keeping focal length fixed. Pulling back gradually reveals the surrounding space.

What changes on screen
The chair shrinks as more courtyard comes into view. Its size relative to the distant columns changes with camera distance, shifting attention from subject to setting.
Common mix-up
A pull-out requires the camera to retreat. Making the image smaller from a fixed position is a zoom-out instead.
Adaptable prompts

English prompt

A stationary red chair in a pale courtyard, with two stationary white columns behind it, in soft daylight. One continuous shot with an intended duration of 6 seconds, no cuts. The chair, columns, and all other scene objects remain still throughout. Start in a closer composition centered on the chair, with both columns in the background. Move the entire camera smoothly backward in a straight line away from the chair. Keep orientation and focal length fixed, with no zoom. Let the chair become smaller as more of the pale courtyard is revealed, with natural perspective changes between the chair and columns.

Watch on YouTube ↗
06

Beginner

Zoom-in

Zoom-in · The camera stays in place while increasing focal length narrows the viewing angle; the chair and columns enlarge together.

Keep the camera in place and increase focal length to narrow the field of view and enlarge the subject. This changes a lens parameter, not camera position.

What changes on screen
The chair and columns enlarge together as the framing tightens. With the camera position unchanged, their perspective relationship stays the same.
Common mix-up
Do not describe a zoom as the camera approaching. A fixed-position zoom does not create the perspective changes of a dolly-in.
Adaptable prompts

English prompt

A stationary red chair in a pale courtyard, with two stationary white columns behind it, in soft daylight. One continuous shot with an intended duration of 6 seconds, no cuts. The chair, columns, and all other scene objects remain still throughout. Begin in a wide frame with the chair centered. Keep camera position, height, and orientation fixed throughout. Smoothly increase the lens focal length to zoom in on the chair, enlarging both the chair and the background columns as the field of view narrows. Preserve their perspective relationship. No forward, backward, or sideways camera translation.

Watch on YouTube ↗
08

Beginner

Roll

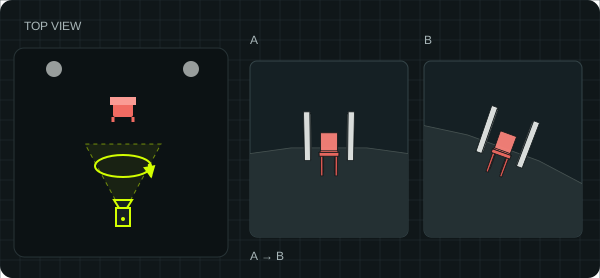
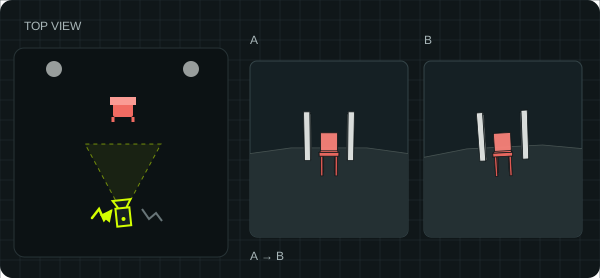
Roll · Front-view diagram: the frame rotates 20 degrees around its central optical axis, keeping the chair centered while the columns and ground tilt.

Rotate the camera around the lens’s optical axis so the frame gradually tilts sideways. Camera position and viewing direction can stay unchanged.

What changes on screen
The chair stays central while the ground and columns tilt together, creating a sense of imbalance. A moving roll differs from a static frame that is already canted.
Common mix-up
Do not describe a roll as circling the chair. The camera rotates around its own optical axis rather than traveling on an arc around the subject.
Adaptable prompts

English prompt

A stationary red chair in a pale courtyard, with two stationary white columns behind it, in soft daylight. One continuous shot with an intended duration of 6 seconds, no cuts. The chair, columns, and all other scene objects remain still throughout. Begin with a level frame and keep the chair centered. Fix the camera position and the direction of its optical axis. Smoothly roll the camera by 20 degrees around that optical axis, making the chair, columns, and ground tilt together in the frame. Keep focal length fixed. Do not orbit the chair, translate, pan, tilt, or zoom.

Watch on YouTube ↗
09

Beginner

Lateral tracking

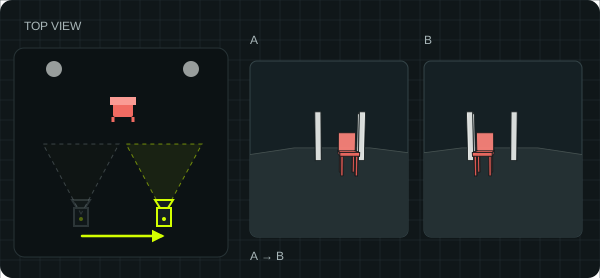
Lateral tracking · Top-view diagram: the camera trucks right in a straight line without turning; the nearer chair slides left in the frame faster than the background columns.

Translate the whole camera sideways. Here it trucks right without turning. Tracking is a broader term for a traveling camera; this example is not following a moving subject.

What changes on screen
The stationary chair and columns slide left in the frame. The nearer chair moves left faster than the farther columns, producing clear parallax.
Common mix-up
Turning toward the chair to keep it centered adds a pan. For this example, hold orientation fixed and let the chair drift left naturally.
Adaptable prompts

English prompt

A stationary red chair in a pale courtyard, with two stationary white columns behind it, in soft daylight. One continuous shot with an intended duration of 6 seconds, no cuts. The chair, columns, and all other scene objects remain still throughout. Use a frame wide enough to include the chair and both columns. Move the entire camera slowly right along a straight horizontal path. Keep camera height, focal length, and orientation unchanged, and do not turn toward the chair. The stationary chair slides left in the frame noticeably faster than the farther columns, creating natural parallax. No pan, orbit, zoom, or movement of the chair itself.

Watch on YouTube ↗

The video opens the trucking chapter to match this lateral-tracking example.

10

Beginner

Arc shot

Arc shot · Top-view diagram: the camera follows a quarter-circle around the chair at a constant distance while continuously aiming at it.

Move the camera along a curved path around the subject while continuing to aim at it. This example follows a quarter-circle at a constant distance from the chair.

What changes on screen
The chair stays roughly central and similar in scale while another side comes into view. The columns and courtyard change position as the viewpoint travels around it.
Common mix-up
Rotating a camera in place is a pan, not an arc shot, and spinning the chair is different again. Specify both the curved camera path and continuous aiming at the chair.
Adaptable prompts

English prompt

A stationary red chair in a pale courtyard, with two stationary white columns behind it, in soft daylight. One continuous shot with an intended duration of 6 seconds, no cuts. The chair, columns, and all other scene objects remain still throughout. Start at the chair’s front-left and move smoothly along a horizontal quarter-circle to its front-right, traveling through a 90-degree arc. Keep the camera-to-chair distance, camera height, and focal length constant. Continuously turn the camera to aim at the chair, holding it roughly central and similar in scale. Let the columns and courtyard shift naturally with the changing viewpoint. The chair itself does not turn or move.

Watch on YouTube ↗
11

Beginner

Boom

Boom · Side-view diagram: the camera rises vertically from seat height to adult eye level, keeping the lens level with no tilt rotation.

Move the entire camera vertically up or down. This example rises from seat height to adult eye level while keeping the lens level.

What changes on screen
As the viewpoint rises, the chair moves lower in the frame and more of its seat and the courtyard floor become visible. Spatial relationships change because the camera itself moves upward.
Common mix-up
Raising the camera is different from tilting up. Do not tilt down to follow the chair in this example, because that would add another rotation.
Adaptable prompts

English prompt

A stationary red chair in a pale courtyard, with two stationary white columns behind it, in soft daylight. One continuous shot with an intended duration of 6 seconds, no cuts. The chair, columns, and all other scene objects remain still throughout. Use a wide field of view so the chair remains visible during the rise. Move the camera smoothly straight upward from chair-seat height to adult eye level. Keep the lens level, orientation unchanged, and focal length fixed throughout. Let the chair move naturally lower in the frame, revealing more of its seat and the courtyard floor. No upward or downward tilt, forward or backward translation, or zoom.

Watch on YouTube ↗
12

Beginner

Gentle handheld

Gentle handheld · The camera makes small, irregular movements near its starting position, keeping the chair roughly central without a sustained forward or orbiting path.

Use small, irregular positional and angular variations to suggest a handheld camera. This is a shooting texture, not a prescribed directional path.

What changes on screen
The chair and columns sway subtly in the frame, like the small movements of a camera operator breathing while standing still.
Common mix-up
Handheld does not have to mean violent shake. Limit the amplitude and exclude rapid jitter, walking bounce, and uncontrolled drift rather than asking only for a shaky camera.
Adaptable prompts

English prompt

A stationary red chair in a pale courtyard, with two stationary white columns behind it, in soft daylight. One continuous shot with an intended duration of 6 seconds, no cuts. The chair, columns, and all other scene objects remain still throughout. Shoot as if the operator is standing in place, keeping the chair roughly centered. Add only low-amplitude, slow, irregular handheld sway, with tiny lateral shifts and subtle angular variations like steady breathing. Keep focal length fixed. No deliberate travel path, walking bounce, violent jitter, whip pans, or zoom.

Watch on YouTube ↗
13

Beginner

Bird’s-eye view

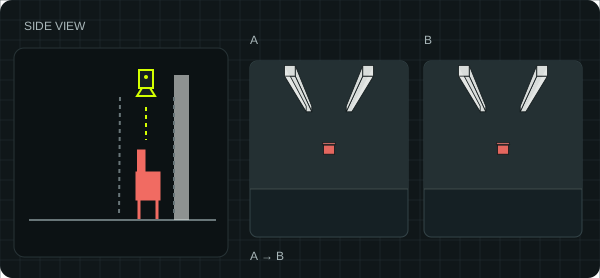
Bird’s-eye view · Side-view diagram: a fixed camera above the chair and columns points straight down; the overhead frame shows the arrangement of the chair and both column tops.

Place the camera directly above the scene with the lens pointing straight down. This example is a fixed overhead viewpoint, describing an angle rather than a movement.

What changes on screen
The chair, column tops, and ground read as a plan-like arrangement that emphasizes position, shape, and spacing. No horizon appears in the frame.
Common mix-up
A high oblique angle is different from a straight-down view, and “aerial” may imply flight. Specify a vertical downward lens and a completely fixed camera position.
Adaptable prompts

English prompt

A stationary red chair in a pale courtyard, with two stationary white columns behind it, in soft daylight. One continuous shot with an intended duration of 6 seconds, no cuts. The chair, columns, and all other scene objects remain still throughout. Fix the camera directly above the courtyard at a height above the tops of both columns. Point the lens straight down, with the optical axis perpendicular to the ground. Frame the red chair, both white column tops, and their arrangement on the pale ground in one overhead composition, with no horizon visible. Keep camera position, orientation, and focal length fixed throughout. No descent, flight, orbit, rotation, or zoom.

Advanced

Explore timing, subject coordination and combined camera paths.

07

Advanced

Dolly zoom

Dolly zoom · The camera retreats while increasing focal length, holding the chair’s screen size nearly constant as the two background columns grow.

Coordinate camera translation with an opposing zoom. In this example, move backward while increasing focal length to keep the chair approximately the same size in the frame.

What changes on screen
The chair stays approximately the same size while the columns behind it grow, creating the impression that the background is closing in.
Common mix-up
Zooming without moving the camera will not produce this effect. Synchronize the backward move and zoom-in, and identify the subject whose screen size should be held steady.
Adaptable prompts

English prompt

A stationary red chair in a pale courtyard, with two stationary white columns behind it, in soft daylight. One continuous shot with an intended duration of 6 seconds, no cuts. The chair, columns, and all other scene objects remain still throughout. Center the chair with both columns clearly visible behind it. Move the entire camera smoothly backward in a straight line while continuously increasing focal length, zooming in to compensate for the retreat. Keep the chair at approximately the same screen height and central position throughout, while the background columns grow larger to create a pronounced background-compression effect. Do not move the chair or substitute a digital enlargement alone.

Watch on YouTube ↗
14

Advanced

Follow tracking

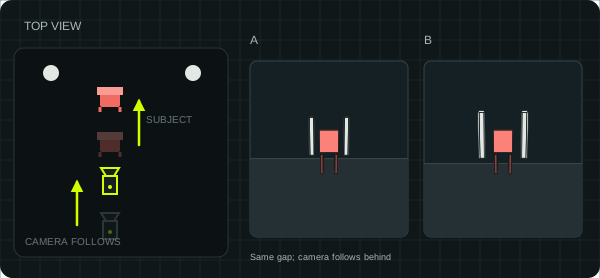
Follow tracking · Top view: the subject and a camera behind it travel along the same route with a maintained gap.

Travel behind a moving subject, matching its speed to maintain the gap. This is rear following, not a push-in toward a stationary object.

What changes on screen
The subject stays roughly the same size while the route and surroundings flow past, placing the viewer behind the action.
Common mix-up
“Tracking” alone does not identify the camera position. State rear placement, subject travel, and the intended gap; do not also require the subject to remain still.
Adaptable prompts

English prompt

In [setting], [subject] moves forward along [route]. In one continuous shot, track behind the subject at a matching speed, keeping the gap and subject size approximately stable. Aim at the back of the subject, maintain [camera height] and a fixed focal length, and follow turns smoothly. Do not overtake, orbit to the front, or zoom. Preserve natural parallax as the surroundings pass.

Tracking subtype

Concept references:www.adobe.com

15

Advanced

Leading tracking

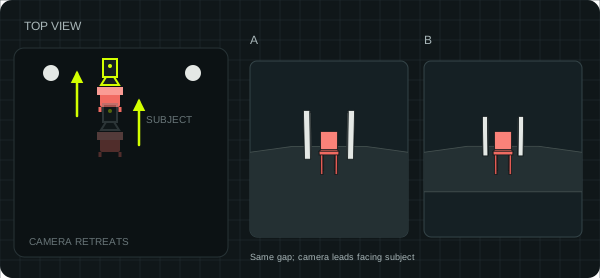
Leading tracking · Top view: camera and subject travel in the same direction; the camera leads while looking back at the subject.

Place the camera ahead of a moving subject, facing back toward it, and retreat at a matching speed. Both travel through the setting rather than simply separating.

What changes on screen
The subject’s front and expression remain visible against changing surroundings. With a steady gap, the subject does not shrink as in a pull-out.
Common mix-up
Camera retreat does not mean the subject walks backward. Specify each direction separately and maintain the gap. A real backward-moving setup needs a cleared, safely managed route.
Adaptable prompts

English prompt

In [setting], [subject] moves forward along [route]. Position the camera ahead, facing the subject’s front, and retreat as the subject advances, keeping [framing] and the relative gap approximately stable. Use one continuous shot, a fixed focal length, and [camera height], with natural background motion. The subject does not move backward. Do not switch to rear following or zoom.

Tracking subtype

Concept references:www.filmmakersacademy.com

16

Advanced

Whip pan

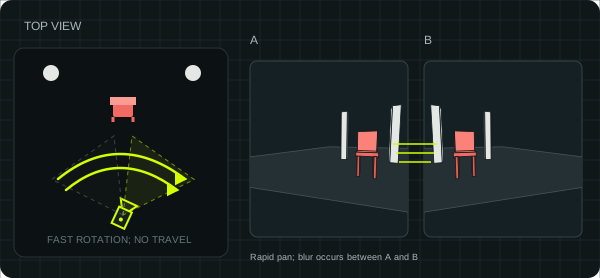
Whip pan · Top view: a stationary camera rapidly rotates from its starting view to a defined landing.

Rapidly pan from a starting composition to a planned landing, then settle. This version rotates in place and is a high-speed variation of a pan.

What changes on screen
Directional motion blur can connect the start and finish. A readable landing gives the rapid attention shift a purpose.
Common mix-up
A whip pan need not hide a cut and is not rapid sideways travel. This example stays continuous in one space; blur depends on shutter settings or model behavior.
Adaptable prompts

English prompt

In [setting], hold a clear view of [starting subject]. Keep camera position and height fixed, whip pan [left/right] with natural directional motion blur during the sweep, then decelerate and settle on [landing subject] in [framing]. One continuous shot, fixed focal length, no cut, sideways translation, or repeated back-and-forth pans.

Pan speed variant

Concept references:www.studiobinder.com

17

Advanced

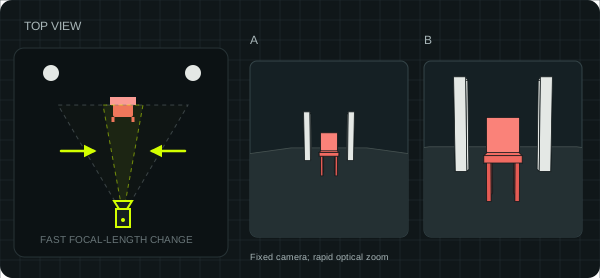
Snap zoom

Snap zoom · A fixed camera rapidly narrows its angle of view without changing position.

Change focal length rapidly to reach tighter or wider framing, then hold. This is a speed variation of zooming, not camera travel.

What changes on screen
The abrupt size change can emphasize a reaction or detail, without the new parallax produced by physically approaching.
Common mix-up
A fast push-in is not a snap zoom. Specify focal-length change with a fixed camera; neither a focus rack nor a cut to a close-up is equivalent.
Adaptable prompts

English prompt

In [setting], frame [subject] in [starting composition]. Keep camera position and orientation fixed and rapidly increase focal length, continuously tightening to [target framing/detail], then stop zooming and hold steady. No cut, forward travel, or roll. Preserve perspective from the same viewpoint; the subject does not approach the camera.

Zoom speed variant

Concept references:www.studiobinder.com

18

Advanced

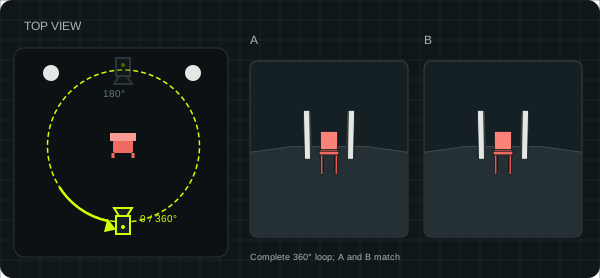
Full orbit

Full orbit · Top view: the camera follows a closed circular route around the subject while aiming inward.

Travel all the way around a subject while continuing to aim at it. This extends an arc to a complete circuit rather than introducing a new basic movement.

What changes on screen
Successive sides of the subject and its surroundings come into view before returning near the initial viewpoint.
Common mix-up
A 360° orbit is neither a panoramic capture format nor an image roll. Specify direction, radius, and height, and keep the subject from rotating with the camera.
Adaptable prompts

English prompt

In [setting], [subject] stays in place. Move the camera [clockwise/counterclockwise] around a complete circular route, maintaining [orbit radius], [camera height], and fixed focal length. Keep aiming at the subject near [screen position]. In one continuous shot, smoothly return near the initial viewpoint. No roll, zoom, or rotation of the subject itself.

Full-circle arc subtype

Concept references:www.studiobinder.com

19

Advanced

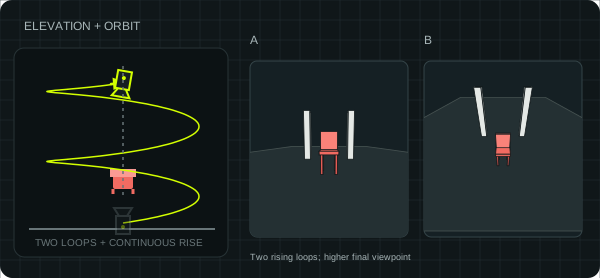
Helical orbit

Helical orbit · Three-dimensional route: the camera rises while orbiting the subject, forming a helix.

Combine travel around the subject with a continuous height change. This example rises at a fixed horizontal orbit radius, forming a helical path.

What changes on screen
Both background direction and viewing elevation change, revealing more of the subject’s upper surfaces and its relationship to the ground.
Common mix-up
“Spiral upward” leaves the radius ambiguous. Here the horizontal radius stays fixed, while pan and tilt adjust to keep the subject visible.
Adaptable prompts

English prompt

In [setting], [subject] stays in place. Orbit in [direction] while rising smoothly from [starting height] to [ending height]. Keep the horizontal orbit radius and focal length fixed, adjusting pan and tilt to hold the subject near [screen position]. Use one continuous ascending helical path, not an in-place roll. No sudden height jumps or zoom.

Orbit + vertical travel

Concept references:repair.dji.com

20

Advanced

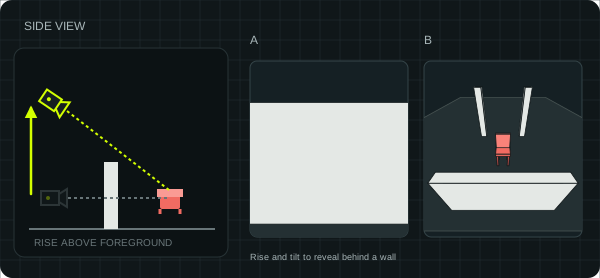
Crane reveal

Crane reveal · Side view: the camera rises behind an obstruction until its sightline clears the top edge and reveals the subject.

Rise from behind a foreground obstruction and adjust tilt to uncover a subject or space. This is a staged application of vertical camera movement.

What changes on screen
The foreground edge clears the line of sight, revealing previously hidden space and making the setting easier to understand.
Common mix-up
Tilting alone may not see past an obstruction. Actual height change is required here, with a planned reveal and final framing rather than an unmotivated rise.
Adaptable prompts

English prompt

In [setting], start low behind [foreground obstruction], with [target subject/space] partly hidden. Raise the camera smoothly until the sightline clears the obstruction, gently adjusting tilt to reveal the target and settle into [final framing]. One continuous shot, fixed focal length. The obstruction stays solid and still; do not replace the rise with transparency, a cut, or travel through solid objects.

Rise + reframing application

Concept references:www.studiobinder.com

21

Advanced

Lateral reveal

Lateral reveal · Top view: the camera moves laterally past an obstruction edge, exposing the previously hidden subject.

Move sideways past a foreground obstruction to uncover a subject behind it. This applies lateral translation to a planned occlusion reveal.

What changes on screen
The nearby obstruction slides aside faster than the distant subject, making depth and the act of discovery visible.
Common mix-up
Do not move the obstruction or substitute a stationary pan. Parallax is a result of camera translation, not a separate basic movement.
Adaptable prompts

English prompt

In [setting], place [subject] behind [foreground obstruction]. Begin partly obscured, then truck smoothly [left/right] at a fixed height so the foreground naturally clears the sightline and reveals the subject. Settle into [final framing]. Keep focal length and camera orientation fixed in one continuous shot. Subject and obstruction stay still; no cut, zoom, or disappearing obstruction.

Truck + occlusion application

Concept references:www.studiobinder.com app-store.dji.com

22

Advanced

Pass-through move

Pass-through move · Top view: a continuous camera route connects spaces through an opening, not through a wall.

Follow a continuous route through a doorway, arch, or other opening into the space beyond. This describes a travel path, not passage through solid walls.

What changes on screen
Opening edges expand outward and nearby surfaces pass the camera, progressively connecting the spaces on either side.
Common mix-up
A pass-through is not synonymous with long-take storytelling, nor does it require an FPV drone. Specify a traversable opening and a coherent route without warping or teleportation.
Adaptable prompts

English prompt

Start in [initial space] and move smoothly forward along [clear route], through [traversable opening], into [destination space], settling into [final framing]. Use one continuous shot with [camera height] and a fixed focal length. Keep the opening and surrounding geometry stable, with natural foreground parallax. No cut, teleportation, or passage through walls or other solid objects.

Forward-travel application

Concept references:app-store.dji.com www.filmmakersacademy.com

23

Advanced

Arcing push-in

Arcing push-in · Top view: the camera follows an inward-curving route, reducing its distance to the subject.

Move around the subject while decreasing the camera-to-subject distance. At a fixed height, the path curves inward instead of maintaining a constant-radius orbit.

What changes on screen
The subject grows while its visible side changes, combining an approach with a shifting viewpoint and background parallax.
Common mix-up
Do not demand a constant gap and an approach simultaneously. Distance changes without zooming; unlike a helical orbit, this example keeps height fixed.
Adaptable prompts

English prompt

In [setting], [subject] stays in place. Start at [initial side and distance], then move along a [clockwise/counterclockwise] inward-curving route toward [ending side], smoothly reducing the gap. Keep aiming at the subject near [screen position] and settle into [final framing]. One continuous shot, fixed focal length and height. No zoom, rise, descent, or rotation of the subject itself.

Arc + push-in

Concept references:www.studiobinder.com www.studiobinder.com

24

Advanced

Pullback rise

Pullback rise · Side view: the camera retreats diagonally backward and upward while continuing to aim at the subject.

Move away from the subject while gaining height, adjusting the viewing direction to keep it in frame. This combines a pull-out with a rise and is common in aerial work, but is not tied to one device.

What changes on screen
The subject becomes smaller as its surroundings and ground layout open up, shifting emphasis from the subject to its place in the setting.
Common mix-up
This is neither a level pull-out nor a rise in place. Specify both increasing horizontal distance and height. Demanding constant subject size would conflict with this widening view.
Adaptable prompts

English prompt

In [setting], begin with the stationary [subject] in [starting framing]. Retreat smoothly along a diagonal backward-and-upward route, rising from [starting height] to [ending height] while adjusting tilt toward the subject. Keep focal length fixed, allowing the subject to shrink naturally as the surroundings open up. Settle into [final framing] in one continuous shot. No zoom, orbit, or abrupt change of direction.

Pull-out + rise

Concept references:repair.dji.com

25

Advanced

Moving-subject orbit

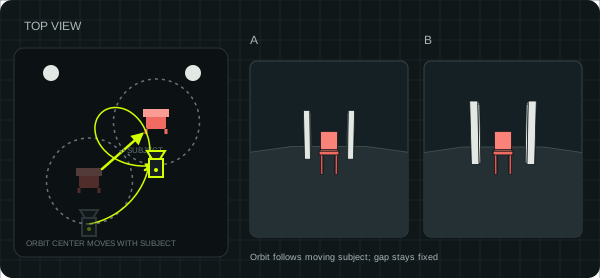
Moving-subject orbit · Top view: the subject travels along a route while the camera orbits around its changing position; the orbit center moves too.

Follow a traveling subject while progressively changing the camera’s position around it. Because the orbit center travels with the subject, the camera does not follow a fixed circle on the ground.

What changes on screen
The subject continues along its route while the view shifts around it. Background changes combine forward travel with changing camera azimuth.
Common mix-up
A stationary subject gives an ordinary orbit; a constant relative side gives ordinary tracking. Define both the subject route and the changing relative camera position, with a clear movement envelope.
Adaptable prompts

English prompt

In [setting], [subject] keeps moving along [route]. Follow its translation while orbiting smoothly [direction] from its [initial side] to its [ending side]. The orbit center travels with the subject. Maintain approximately constant relative distance, camera height, and focal length, continually aiming at the subject. One continuous shot. The subject does not stop or spin; do not circle a fixed ground point, zoom, or cross obstacles.

Tracking + orbit

Concept references:developer.dji.com